


Destiny 2’s Sundered Doctrine dungeon brought an enticing story, interesting mechanics, and even a way to focus loot if you’re brave enough to complete the dungeon quest. And its drops are nothing to scoff at, either.
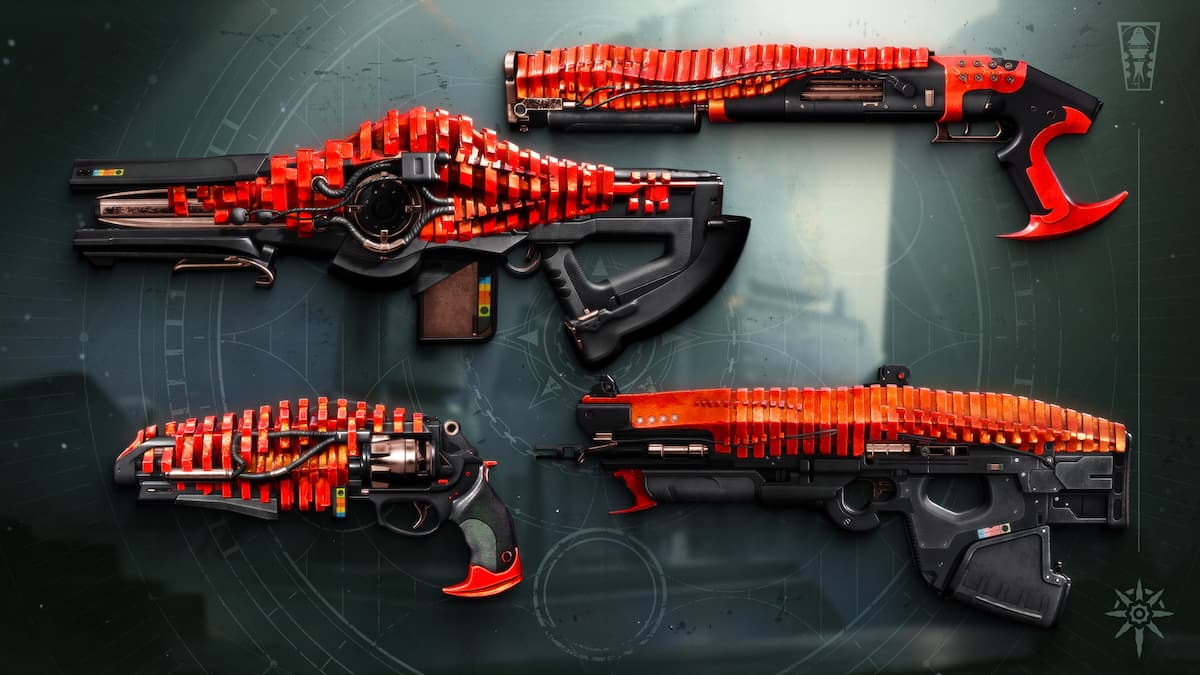
Sundered Doctrine has four weapons with fresh and unique perks. To focus your drops, however, you must first complete the Drowning Labyrinth quest for the Sundered Doctrine dungeon, which is time-consuming in itself (but at least you’ll be stocked on drops by the time you do).
Focusing lets you choose one piece of gear after you complete the dungeon. Of course, this method has a limitation: you can only get it once per character per week, but that’s already better than being at the mercy of RNG. And, as far as we can tell, this is an extra drop in addition to the secret chests. Here’s how you can focus your Sundered Doctrine loot, as discovered by content creator Skarrow9, the prince of puzzles in Destiny 2.
How to unlock weapon focusing in the Sundered Doctrine dungeon in Destiny 2
Before you take a trip to Rhulk’s Pyramid expecting to get some goodies, you must go through some steps. Unlocking weapon and armor focusing in Sundered Doctrine requires completing the (somewhat lengthy) Drowning Labyrinth quest.
This quest tasks you with finding three sets of three worms spread out across the dungeon, though you must make a few stops along the way. You should expect at least four or five clears due to the quest’s bouncing trajectory: you must find the worms, reset the dungeon, and clear the final encounter. Once you do, though, you can choose your drops forever. This activity borrows from the Rogue Network quest in Vesper’s Host, but it’s far less convoluted and the steps aren’t nearly as convoluted.
How to focus your loot in the Sundered Doctrine dungeon
After clearing the Drowning Labyrinth quest, head back to the Hidden base camp. This will reveal another document (this time, to the left of the dial). Input the final code (Worm, Give, Guardian) to get a message above your Super bar indicating you’ve done it properly. By now, you should be Fully Initiated, as indicated by the eponymous buff on the left side of the screen.
After that, turn around and look for a crate on the front-right side of the camp (if your back is to the dial). A symbol should appear above it, indicating the drop you’re focusing on. A blank symbol means you’re not targeting any specific drops. As a caveat, trying to focus armor you haven’t obtained can lead to you getting a duplicate drop of something else, Skarrow9 warns.
The next step to focusing your weapons and armor is finding and interacting with the appropriate symbol. The glyphs are in each Hive Worm room you found during the Drowning Labyrinth quest, and each matches one specific drop. Here’s each of them, according to Skarrow9, and their locations.
| Item | Symbol | Dungeon area | Symbol location |
| Chest armor | Witness | Before the first encounter | Just below the bridge outside the Hidden base camp. |
| Helmet | Hive | Before the first encounter | In the area where you jump down through some holes with red and white light. |
| Class Item | Guardian | Before the first encounter | In the flooded room with the waterfall passage, on a wall to the right. Grab this before entering the passage. |
| Gauntlets | Give | Before the second encounter | In the area with the control room. This one is on the left side of the zone. Shoot the door to enter. |
| Shotgun (Unvoiced) | Grief | Before the second encounter | In the sloped area that tries to throw you into the abyss. |
| Scout rifle (Unworthy) | Knowledge/Remember | Before the second encounter | In the area with the spiked spheres rolling down on you. |
| Hand cannon (Unloved) | Darkness | Before the final boss | In the room with the Worm and Enter glyphs, to the left of the Worm symbol. |
| Trace Rifle (Unsworn) | Worm | Before the final boss | In the room with the large Worm symbol on the wall and the Hive Worm corpses. |
| Leg armor | Fleet | Before the final boss | In the room just past the Worm and Enter glyphs. |
All symbol room locations for the Sundered Doctrine dungeon
We’ve listed the location of every symbol room we’ve found so far. There are nine symbols in total, three before each encounter, so the first three rooms are located before the first boss. The rooms are largely in the order they appear through a normal run of the dungeon, not the order they launched alongside the Drowning Labyrinth quest. The exception seems to be the Darkness and Worm glyphs.
Witness (Chest armor)
The first symbol in Sundered Doctrine is just across from the Hidden base camp, below the bridge leading to the rest of the dungeon. Look for the invisible platforms with your Ghost if you’re a bit lost, then interact with the Witness symbol to focus your drop into a chest piece.
Hive (Helmet)
The second symbol is Hive, which lets you focus your unique drop into a helmet. After you get past the two Subjugators and crawl through a hidden passage in the wall, you must jump down at some point. Drop through the first hole (the one with red lights), and you’ll land just beside an Activate prompt, which opens up the room with the Hive symbol. If you can’t find it, drop until you reach a muddy floor, hop on the rock, and jump to the ledge opposite you. Then, do that again to find the prompt.
Guardian (Class item)
After you drop down past the Hive room, you’ll find a flooded area with one of the objectives in the Drowning Labyrinth quest. Head inside, clear the enemies and look to the right (from the entrance) to find a wall. It’s within the range of your Fully Initiated buff. Climb onto the wall and shoot the door to open the Guardian symbol, which drops a class item. This is probably not useful for regular runs, but this could be useful to guarantee an Artifice drop on Master.
The next three symbols are located between the first and second encounters.
Give (Gauntlets)
The room with the Give symbol is just after the first encounter, where you activated the control room during the Drowning Labyrinth quest. This one is on the far left side of the zone, parallel to the door you go in to continue the dungeon.
Grief (Shotgun)
The Grief symbol awards the Unworthy shotgun upon completing Sundered Doctrine. If you want this drop, continue through the dungeon until you get to the incline that attempts to throw you into a gap (Duality flashbacks). Stand on the right wall in this room to trigger this door, just before the next booby-trapped room.
Knowledge/Remember (Scout rifle)
To get the Unworthy scout rifle, find the Knowledge room in the area with the rolling traps. This secret area is at the far end of the hallway with the rolling traps, so mind your step. Look to the left for an interact prompt. Sundered Doctrine calls this “Remember,” but the good old Vow of the Disciple refers to it as Knowledge.
The next three rooms are between the Zoetic Lockset and Kerrev, the Erased.
Darkness (Hand cannon)
If you want the Unloved hand cannon, head to the room with the Worm and Enter glyphs. The door to the room with the Darkness symbol is just to the left of the plate with the symbol. The second secret chest is on your right.
Worm (Trace rifle)
The room with the Worm glyph, fittingly enough, is in the room with the enormous Worm symbol on the wall. As you walk into the room, look for a door on the left side. The room with the symbol is slightly above the door on the left, before the wall with some bars on it. Shoot the door to get inside and interact with the symbol to change your end-of-activity drop into the Unsworn trace rifle.
Fleet (Leg armor)
The final glyph room is right past the door with the Worm and Enter symbols. Instead of following the intended path and shooting the door open, look to your left to find a part of the wall that looks different. It’s lighter and seems to be made of a different material. Stand on it to open the final room with the Fleet symbol, which gives you leg armor.
Where to get your focused drop
Regardless of what you focused on, you can obtain your drop from Rhulk’s vault after defeating Kerrev, the Erased. This is the same chest that gave you the class item and the Finality’s Auger catalyst if you had the Exotic beforehand. You can do this once per character per week, according to Skarrow9.
Read the full article here


Discussion about this post