


Kingdom Come Deliverance 2 rewards players for exploration with several rare types of loot. You can find the best ones at specific marked locations shown by treasure maps. These maps can be found across Bohemia, and each of them will lead to a piece of rare armor or weapon, including the unique Brunswick Armor set.
This is where you can find every map and their marked locations.
Treasure maps in Kingdom Come Deliverance 2
You can acquire maps by various means in Kingdom Come Deliverance 2. Four major treasure maps are scattered across the two main regions in the game. Two can be found in Trosky, while the other two are in Kuttenberg. You can get all four maps during the Seeking Man random event you might encounter while fast-traveling.
The locations these maps uncover are also found in their respective regions, and here is where each map points to.
Treasure map one
Treasure location: Apollonia
The first treasure map will take you all the way to the far eastern section of the Trosky map. Apollonia is a forested region full of bandits and wild animals, so be careful if you’re at a lower level. First head to the fast travel point and then take the road upwards through the forested lower ground.
Once you reach the northern exit, take a left and stop at the Cave in Apollonia point of interest. Following this path will take you to the Cave under Trosky point of interest shown above.
Make sure to bring a torch because the cave will be very difficult to navigate without light. The path is quite straightforward, with a few dead-end branches and some sacks of loot along the way. Climb up two ladders to reach the room you need to find. Look around to find a key to the locked treasure chest and unlock it to get some Groschen, Frankfurt Steel, and some Ancient Moonshine.
We recommend hunting for this treasure after you finish the Trosky main quest line and unlock the underground cave door beneath Trosky Castle so that you can make a quick getaway.
Treasure map two
Treasure location: Rocktower Pond
The second treasure map points towards Rocktower Pond, past the camp area where Henry’s company was ambushed at the start of the main story. Head back to your original camp, but beware because bandits will now occupy it. Once you get past them, take the main road northeast for a while then head straight up through the first turn into the forested area as shown above.
This is where you will find a few rocky outcroppings with the treasure resting on one of them. If you get near enough, you should see the “Skeleton with Treasure” point of interest. You won’t be able to access it unless you get on top of the rocks so take a right until you find a path going uphill. When you’re at the top, leap across to the rocks in the middle. Having the Featherweight perk will be helpful here.
Hop over from one rock to another safely until you see a skeleton with a pot of treasure beside it. Loot it to find some Groschen, jewelry, and chalices of gold and silver.
Treasure map three
Treasure location: Kuttenberg Underground
The third treasure map will take you to the main city of Kuttenberg. Fast travel to the western exit of the city and make your way down the southern path to find one of three entrances to the Kuttenberg Underground region, as shown above. All three paths will take you to different areas in the Kuttenberg Underground, and the one you want to pick is the southeastern entrance.
You’ll know you have found the right entrance when you find a ruined house with a hidden path to the underground entrance. Step down and proceed forward until you reach an archway. Take the first left and follow the path until you see another split. Take the right path until you reach the final split with three different paths. Once again, choose the right path and keep pushing forward.
A circular symbol that matches the map will mark the correct path. You will find a sack with Groschen, a skill book, and a Scapular with Aperture when you reach the end.
Treasure map four
Treasure location: Millstone Quarry
The fourth treasure map will lead you to the southern half of Kuttenberg. The location you want to find is Millstone Quarry, an area to the south of Bylany and the north of Maleshov. The fastest way to find the location marked above would be to fast travel to Bylany and then take the forested path to the southeast. Keep going until you find the Millstone Quarry point of interest and stop here.
From this point on, look for white stones with a hole in the middle. These are Millstones and following their trail will lead you to the treasure. For best results, start from the spot shown above and move southeast while following the millstones you find. You can find the treasure in a chest under a huge willow tree that has fallen on the ground.
Open the chest to find some Groschen, a skill book, jewelry, and a sturdy Kettle Hat for your troubles.
Additional treasure maps
Apart from these four main treasure maps, you might acquire a few minor ones along your journey. These maps also provide a fair amount of loot, and most of them can help finance your endeavors in the early-mid stages of the game if you want to explore these areas.
| Map | Region | Treasure location |
| Drowner’s Map | Trosky | Water Goblin’s Treasure point of interest to the northeast of the Nomad’s Camp |
| Hired Hand Ventza’s Map | Trosky | Cave to the north of the Apollonia fast travel point |
| Lower Semine Woodcutters’ Map | Trosky | Fresh Clearing point of interest to the west of Lower Semine |
| Map of Game near Slatego | Trosky | Unfinished Cottage point of interest to the south of the Apollonia fast travel point |
| Vidlak’s Treasure Map | Trosky | Hollow Tree and Washed-up Chest points of interest upstream to the northeast of Vidlak’s Pond |
| Bohuta’s Map | Kuttenberg | Buried Stash point of interest to the southwest of Pschitoky |
| Krizhan’s Treasure Map | Kuttenberg | Cave near a bandit camp to the northeast of Old Kutna |
| Map from Chest by Sedletz | Kuttenberg | Hidden Ladder point of interest to the northeast of Kuttenberg |
| Smuggler’s Map | Kuttenberg | Locked chest in a hut to the northwest of Old Kutna |
Along with these maps, you could find others through random events and bandit encounters leading to even more treasure. If you have the pre-order DLC, you can acquire another major treasure.
Bonus: Brunswick Armor set
The Brunswick Armor set is uniquely available to players with access to “The Lion’s Crest” DLC, which was available as a pre-order reward. This quest will give hints about various locations on the Trosky map adorned with crosses. Searching these locations will provide you with pieces of the Brunswick Armor set. Collect all of them to find the entire set of unique armor and weapons.
Start The Lion’s Crest quest by talking to Scribe Gaibl in the Troskowitz Rathaus. After seemingly solving his riddle (or not), you will be tasked to find the first piece. Fast travel to Trosky Castle and move to the north. Head up through the forested area until you find the Chapel in the Rocks point of interest. This is where you find a cross that you can push aside.
Dig up the area to find a chest with Brunswick’s Dagger, Brunswick’s Gauntlets, and some clues.
Brunswick map one
Head left from the current shrine until you find the Wolf Hunting Spot point of interest. This one should be a fair distance to the north from Tachov. Once here, you will have to fend off a few wolves feasting on a corpse. Drop down from the corpse to find a sack containing Brunswick’s Chainmail Coif, Brunswick’s Plate Leg Armor, Brunswick’s Caparison, and more clues.
Brunswick map two
Next, head to Vidlak’s Pond and go northeast until you find the Crosses in the Rocks point of interest. This section will have you climb some rocks until you find a fallen log leading to another cross. You should see a chest right in front of the cross. Open it up to find Brunswick’s Plate Sleeves with a clue to the next spot.
Brunswick map three
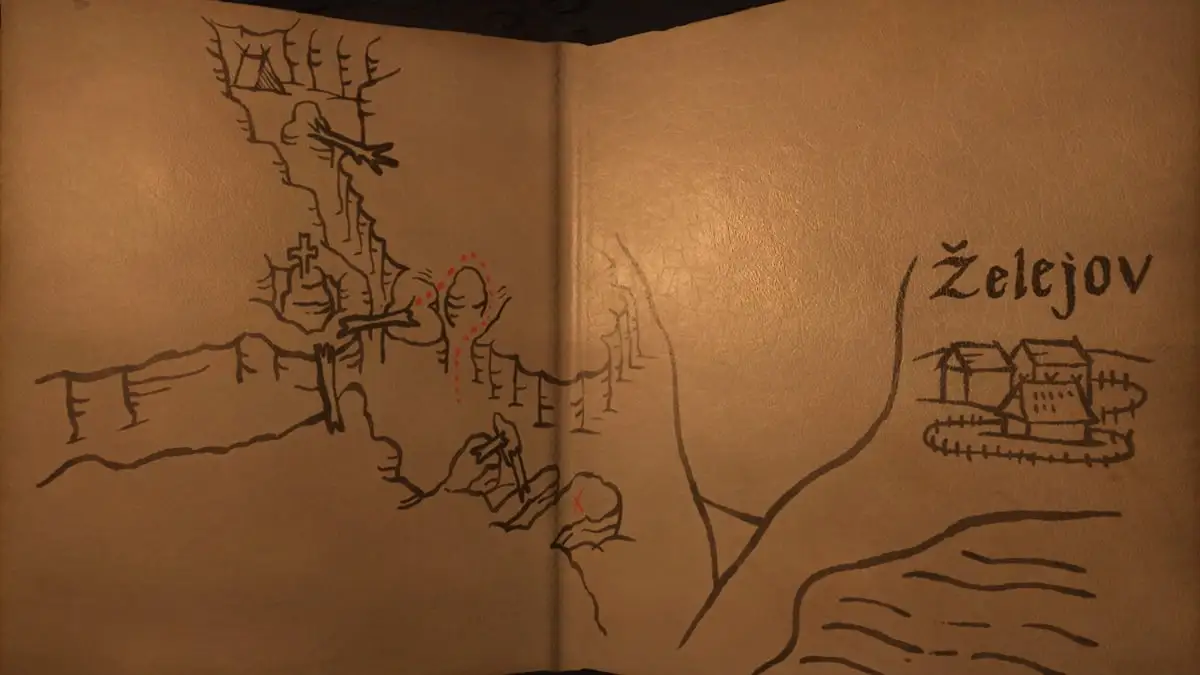
Fast travel to the Zhelejov Wagoner’s Inn travel point and head north through the forested area to find the Cross and Skeleton points of interest. Go as close to the point of interest and search for a large tree with a skeleton lying against it. You should find a broken cross with a sack next to it. Interact with it to find Brunswick’s Brigantine and your final clue.
Brunswick map four
You can find the final piece in the middle of the Treasure Hunter’s Camp point of interest to the northeast of the Nomad’s Camp. The treasure hunters will not take kindly to you, so dispose of them and search for a pile of rocks with a cross on it. You will find Brunswick’s Bascinet and end the quest.
For best results, we recommend leveling up your Scholarship to 18 and gaining access to the Explorer perk. Picking this up will reveal the entire map to you, including all points of interest, making it much easier to scan and find the locations you need.
Read the full article here


Discussion about this post