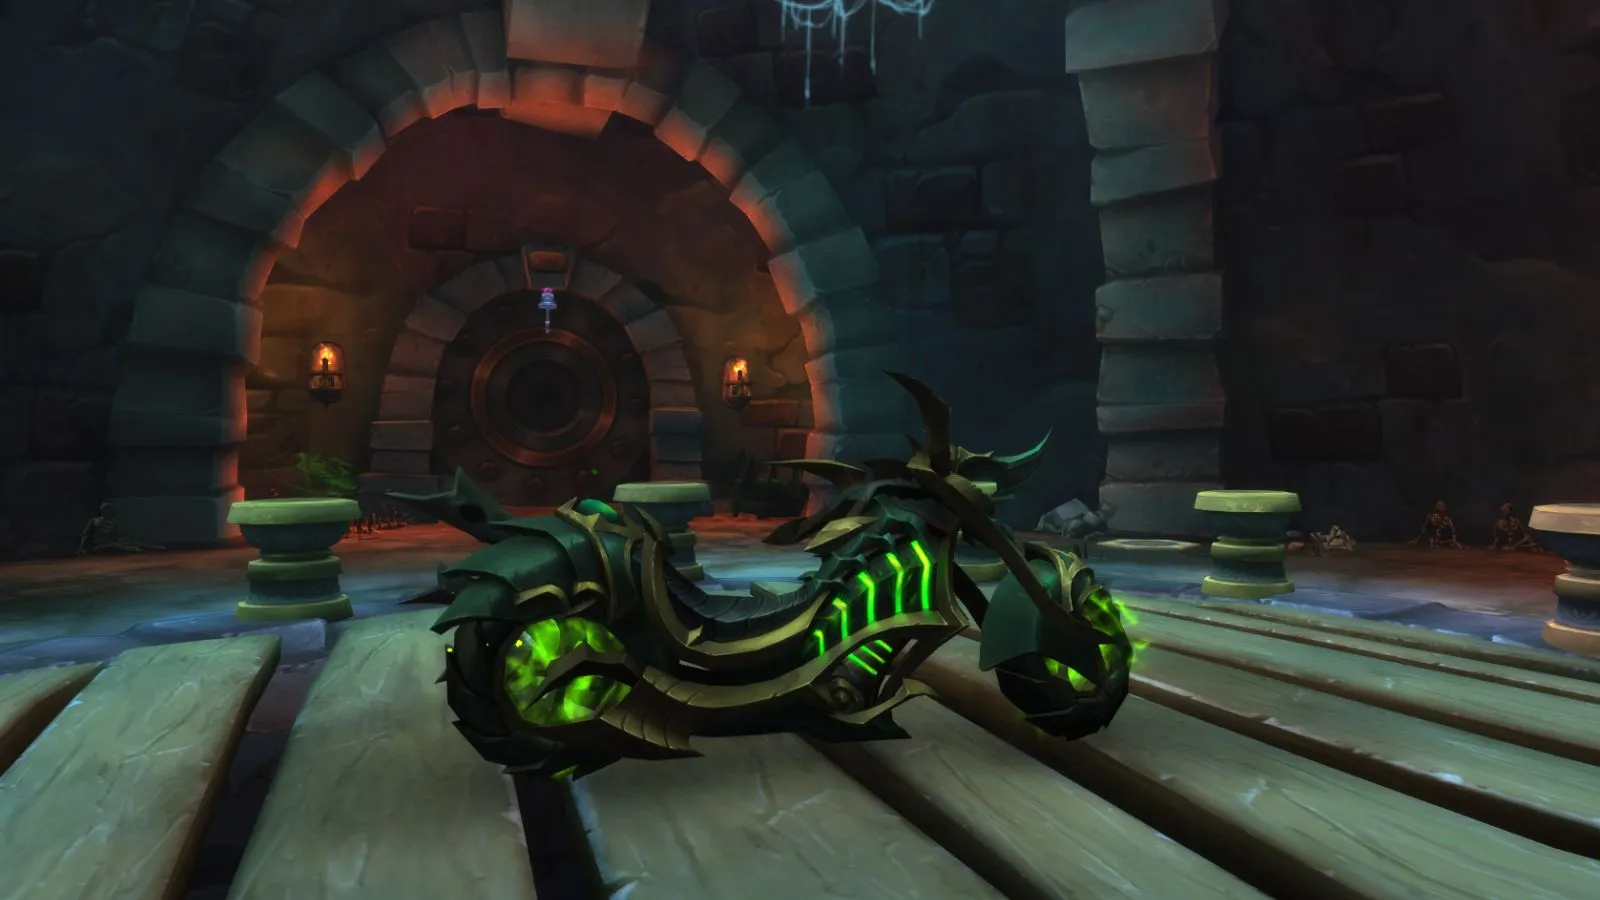
Finding the Keys to Incognitro, the Indecipherable Felcycle in World of Warcraft, is no easy feat. This wickedly cool mount enchanted the player base when it first became available, sending the community’s sharpest secret-finders and rare hunters on a long and challenging hunt.
The secret Felcycle mount is hidden behind a number of quest lines, achievements, events, and puzzles. It’s a long, long line of tasks, but if you’re a collector, it’ll ultimately be worth it, as the mount has one of the best models in the game.
Below, we’ve listed every single task that you’ll need to tick off the list to get your hands on the Felcycle mount, including a breakdown of every achievement, every necessary quest, and the location of every crucial NPC.
Please note—there are elements of the Felcycle ritual circle puzzle which have not been solved yet. Our guide will unlock the Felcycle mount for you, completing nine of the twelve pillars, and we’ll update you with more information once we solve the final three puzzles.
Before you start
The Incognitro Felcycle mount is hidden behind a ritual circle-esque puzzle inside a special version of the Karazhan Catacombs, with twelve pillars surrounding the bike in the middle. To get there, you’ll need the Detective title, specific battle pets, a handful of items, and the Fishing secondary profession.
This is one of the longest mount challenges in WoW at the time of writing, initially solved thanks to the incredible people in the Secret Finding Discord and on the Wowhead team.
To get started, make sure you’ve got the Detective title, rewarded by completing Azeroth’s Greatest Detective, then go shopping for the necessary items to fill in the ritual circle puzzle. When you’ve picked up all the items, you can locate the key to unlock the new instance and start the main puzzle.
Don’t forget to complete this on a character with the Fishing secondary profession, as progress for the Incognitro Felcycle is linked to individual characters and cannot be Warbound. If you have a max level Warlock, it’s worth doing the puzzle with this character—it’ll save you a little time.
Realistically, you will also need to be max level to grab the mount. While nothing is explicitly level-locked, you will need to comfortably travel through endgame zones and deal with mobs, so being max level is highly suggested.
How to get the Azeroth’s Greatest Detective achievement
The first thing you need to get the Incognitro mount is the Detective title. Without this, you will be softlocked and unable to speak to a necessary NPC to make any progress, so it’s important to grab this before doing anything else.
To get this title, you need to finish the Azeroth’s Greatest Detective achievement. This meta achievement states that you must finish two of the following achievements:
- Assistant to the Assistant Guest Relations Manager, which requires you to complete all of the hidden, local Guest Relations story quests from Alyx during the WoW 20th Anniversary event.
- Crate Insurance Agent, which asks you to find and return six of the Celebration Crates to Alyx during the WoW 20th Anniversary event in Tanaris.
- I Saved the Party and All I Got Were These Lousy Hats, which asks you to finish the main storyline for Guest Relations.
- No Crate Left Behind, which expands on Crate Insurance Agent and asks you to return all eleven of the missing Celebration Crates during WoW‘s 20th Anniversary event.
Once the Anniversary Event is over, Alyx will be relocated to Dornogal. The achievement will still be attainable but will likely go through a few changes, so check back here for updated information on how to grab the title.
While it’s worth doing all four achievements to grind Bronze Celebration Tokens and achievement points, it’s not necessary to grab Incognitro.
You can complete any two out of the four, but we’d suggest completing Crate Insurance Agent, and I Saved the Party and All I Got Were These Lousy Hats. These achievements took the least time and effort out of the four.
The second achievement was initially time-locked to a degree when the 20th Anniversary Event kicked off, making players wait between chapters to make progress, but it’s now possible to burn through it in less than a day—it took us about four hours of uninterrupted gameplay to do this.
To start collecting Celebration Crates, speak to Alyx and ask for even trickier challenges. Once you do this, Ransom Notes will appear on the notice board with clues for each Celebration Crate.
The quickest crates to pick up for Crate Insurance Agent are:
- Sandy Celebration Crate, from the Sandy Ransom Note
- Waterlogged Celebration Crate, from the Sun-Baked Ransom Note
- Charred Celebration Crate, from the Burnt Ransom Note
- Crystallized Celebration Crate, from the Shiny Ransom Note
- Surprisingly Pristine Celebration Crate, from the Surprisingly Pristine Ransom Note
- Ghostly Celebration Crate, from the Ghostly Ransom Note
You will need to hand these in to Alyx each time you pick them up, so make sure you’ve got plenty of space in your quest log.
When you’ve finished the final quest of the Guest Relations storyline (A Surprising Investigation) and handed in six Celebration Crates, you will unlock the Detective title. Now, it’s time to go shopping and pick up all the necessary items for the Felcycle mount.
Your shopping list
There are lots of necessary items to pick up for this mount task. A handful of them are skippable if another player is completing the same pillar task at the same time as you and you’re in proximity, but it’s worth gathering as many of them as you can nevertheless.
You’ll need the following items:
- Fledgling Warden Owl battle pet
- Perky Pug battle pet
- Level 25 versions of three battle pets from this list:
- Baa’l
- Bumbles
- Jenafur
- Glimr
- Gurgl
- Nelthara
- Spyragos
- Sun Darter Hatchling
- Snowclaw Cub
- Taptaf
- Terky
- Wicker Pup
- Either the “Dogg-Saron” Perky Pug costume or the “Yipp-Saron” Perky Pug costume
- One of the following items:
- All-Seeing Eyes
- Gift of N’zoth
- Twitching Eyeball
- Scroll of Fel-Binding
- The following Lucky items:
- Lucky Charm
- Lucky Dragon’s Claw
- Lucky Duck
- Lucky Horseshoe
- Lucky Rat’s Tooth
- Lucky Shirt
- Lucky Tortollan Charm
- Items that meet the following requirements for the altar section:
- Blood items:
- A mount with “Blood” in its full item name
- A pet that also has “Blood” in its name
- The Throbbing Blood Orb toy
- Corrupt items:
- A mount with “Corrupt” in its name
- A pet that also has “Corrupt” in its name
- Either the Ring of Broken Promises toy or the Accursed Tome of the Sargerei toy
- The Cloak of Overwhelming Corruption
- Lust items:
- Either the Sister of Temptation battle pet or the Heartseeker Moth battle pet
- Items created by the Steamy Romance Novel Kit
- Either transmog that hides your entire outfit or being currently under the influence of the Moroe’s Famous Polish item
- Sin items:
- The Sinheart battle pet
- The Bondable Sinstone toy
- Any of the Venythr Sinstone cloak appearances
- Void items:
- One of the following pets:
- Lesser Voidcaller
- Mind Slurp
- Sir Mrrgglton Junior
- Shadow
- Void Shardling
- Voidwiggler
- One of the following pets:
- Blood items:
It’s a hefty list, but putting in the effort to check you have everything now will prevent you from getting stuck at a later stage. While some of these will require unlocking, either through achievements or quests, a large chunk can be purchased via the Auction House.
If you’re a Warlock, you can bypass the need for a Scroll of Fel-Binding with your existing tool kit, so don’t worry if you can’t get hold of one of them.
As this puzzle is still being unraveled, bear in mind that some of the smaller lists of items are not comprehensive. New battle pet combinations may be discovered that meet the criteria for the questline, for example. We’ll update this guide as more information becomes available.
It’s also unknown currently exactly how many Lucky items you need. We’d recommend grabbing them all to be on the safe side, but if you can only find six of them for whatever reason, it’s likely that you’ll still be able to make progress based on community reports.
Again, we’ll be sure to update once further information becomes available and once we’ve tested the methods more comprehensively.
Once you’ve picked up your items, learned how to Fish, and equipped the Detective title, it’s time to track down the Inert Key and Peculiar Gem, craft the Peculiar Key, and get into the Karazhan Catacombs instance. Grab a snack and get comfy—you’ve got a while to go yet.
Unlocking the Karazhan Catacombs
At this point, you should have the Torch of Pyrreth toy from the Guest Relations quest line, along with the necessary items and title to pick up the mount.
Next, you need to find both the Inert Key and the Peculiar Gem to access the new version of Karazhan Catacombs. This location was initially a Battle For Azeroth Scenario instance, but this fresh instance is tied to the Felcycle mount in particular.
Make sure to follow the steps sequentially so you can pick up the appropriate quests and avoid any issues with zoning out.
Where to find the Inert Peculiar Key
The Inert Peculiar Key is in Un’Goro Crater in Kalimdor. Equip the Torch of Pyrreth toy and head over, flying to the northern section of the zone.
Here, you’re looking for the Marshal’s Refuge camp, tucked into the cliffs along the northern edge of the zone.
In this neutral camp, you’ll be able to find a hollow tree with some crates stacked up inside it. Approach with the Torch toy equipped—it’ll activate, indicating where the Inert Peculiar Key is, just behind the stacks of crates.
Pick it up and head to Dornogal to continue.
Where to find the Peculiar Gem
Head to the location shown in the mini-map below and equip the Detective title before speaking to the Dalaran Survivor NPC.
This NPC will give you a quest called Ratt’s Race when you speak to her with the title equipped. The quest involves finding three notes across Azj-Kahet before finding the titular Ratts and picking up the Peculiar Gem.
The first item, the Unfinished Note, can be found inside a cave in a valley east of the City of Threads. It’s sat inside the cave, surrounded by five mushrooms.
The next quest item, the Hastily-Scrawled Note, can be found on a ledge overlooking the City of Threads as shown in the mini-map below.
The final item, the Water-Resistant Note, can be found underwater in a cave that sits between the Azj-Kahet and Hallowfall border.
When you have the three quest items, head to the Pillar-nest Vosh cave in Azj-Kahet.
Turn right when you enter—you’re looking for the room with the Agaricus Festerbloom mob, as it contains a secret tunnel in the wall that the enemy is facing. Climb the wall using the ledges, then jump into the small hole that’s fourth from the left.
Don’t worry about taking fall damage, as you’ll end up in a pool when you land. Here, you’ll see Ratts, who will do a small speech before vanishing and dropping the Peculiar Gem.
Pick up the Peculiar Gem, then select it again in your inventory to combine it with the Inert Peculiar Key, creating the Peculiar Key. Then, head to the Eastern Kingdoms to continue.
How to get to Karazhan Catacombs
You’re almost at the point where you can start solving the Incognitro Felcycle puzzle. Next, you need to make your way to Deadwind Pass and find Karazhan.
The Karazhan Catacombs instance entrance is at the very base of the main tower, indicated by glowing torches and a portcullis. Unless you’re on a quiet server, you’ll likely see plenty of players milling about outside.
Make sure you have the Peculiar Key, then equip the Torch of Pyrreth toy once again as you approach the door.
It’ll glow red and open up, allowing you inside. From there, simply follow the stairs down and keep on the path until you reach the main chamber with the Incognitro Felcycle.
How to solve the Incognitro Felcyle puzzle
There are twelve pillars surrounding the Incognitro Felcycle mount in the Karazhan Catacombs, but you only need to solve nine of them to get the mount. This must all be on one character, as the Felcycle is not Warbound.
Community members believe that solving all twelve will unlock flying for the mount, but at the time of writing, it’s not possible to solve all twelve, and this is just speculation.
You must do the pillars and their corresponding steps in order for the puzzle to work. Check the image below for an indication of which one is the first pillar.
You don’t need to return to the Catacombs after every step, though, and your progress will be saved should you end up dying or leaving, with a glowing orb on the pillar indicating a successful solution.
As mentioned earlier, some of the pillar puzzles can be solved simply by being in close proximity to someone else with the required items or in the required state. It’s not guaranteed to work, but heading to a puzzle location can sometimes reward you with an insta-solve just for being there.
First pillar
First, you need to get three stacks of a buff called The Light of Their Love, which will be indicated by a small bonfire icon.
To do this, you need to use the Torch of Pyrreth near these three locations or characters:
- The Humble Monument in Northern Barrens
- Olgra in Nagrand, Draenor
- Decimator Olgra in the Burning Thicket section of Maldraxxus, Shadowlands
If you’re playing a Horde character and have completed the Consumed by Vengeance quest, Olgra may not show up for you at her usual location. Check her alternate spawn instead if this happens, as you’ll still be able to get the buff.
Don’t worry about heading to the Northern Barrens as an Alliance player, as you can easily pick up the buff without triggering any of the nearby Horde NPCs.
Picking up three stacks of the buff will mark the first pillar as complete. Remember, you don’t need to head back to the Karazhan Catacombs to check each time, so just keep on going. The buff will stick around for three hours total, so there’s not much of a time crunch to get from A to B.
Second pillar
This step requires you to have access to the Battle for Azeroth version of the Vale of Blossoms in Pandaria, along with one of the N’zoth-related items, the Perky Pug, and one of the Perky Pug costumes.
Fly over to the Ny’alotha Obelisk in the BfA Vale and summon your Perky Pug. Place the “-Saron” costume on the Perky Pug, then use your N’zoth item, target the Obelisk, and do the praying emote. This will add the Key of Shadows item to your bag.
While we would suggest heading to the Ny’alotha Obelisk with all the necessary items ready to go, this is one of the pillar puzzles that community members have reported you can complete with the help of others. For example, you may not need a Perky Pug. If you’re struggling, it’s worth a shot.
Third pillar
For this pillar, you’ll need the Lucky Items we mentioned in our shopping list, along with the ability to fish.
Head through the Chamber Door in the Catacombs and fish inside the Astral Soup. After a few attempts, you should get the Astral Key, letting you open the Astral Chest nearby to get the Starry-Eyed Goggles. Add it to your collection, then equip it to get the buff of the same name.
Now, you will be able to interact with the nine machines in the Catacombs and input a code from the list below to get a Piece of Hate item:
- (Handwritten Code) 51567
- (Hear Code) 115
- (Here #1 Code) 10638
- (Here #2 Code) 5661
- (Ko’nani Code) 88224646
- (Room 430 Code) 17112317
- (Ruben Code) 52233
- (Slots Code) 777, although some players have reported needing to add more sevens
- (Violence Code) 19019
It’ll take some trial and error to assign the correct codes to the correct machines, but once you do input the right code, a chest will pop open nearby with a Piece of Hate in it. Once the final code has been set, you will have finished the third pillar puzzle.
Fourth pillar
This is the pillar where being a Warlock can come in handy. If you’re a Warlock, skip the first step and head straight to Uther’s Tomb in Western Plaguelands.
If you’re not a Warlock and don’t have a Scroll of Fel Binding, find Vashti the Wandering Merchant in Azsuna, wandering down the eastern path. Buy a Scroll of Fel Binding here if you don’t have one already, then hop over to Uther’s Tomb.
In Uther’s Tomb, you need to summon a Doomguard, either with the Fel Binding Scroll or with a Warlock ability. While the Doomguard is present, find and click a hidden piece of graffiti on the floor to complete this pillar.
Fifth pillar
For this pillar, you need the nine Piece of Hate items and three max-level battle pets from the previously listed selection of secret battle pets. This could be Baa’l, Nelthara, and Wicker Pup, for example, and it’s recommended that they’re Rare quality, too.
Find an NPC named Zarhym inside the Cave of Lost Spirits on the Timeless Isle and speak to him to travel to the realm of the spirits.
Once you’ve realm-hopped, challenge Jeremy Feasel in the back of the cave to a pet battle. This can take some practice as his team is max level and has some RNG elements to it, so it’s worth using any pet healing items you have on hand sparingly.
When you beat the fight, you will get the simple turn-in quest Master of Secrets. This will reward you with a Golden Muffin.
Head to Booty Bay and find the Pointless Treasure Salesman inside the goblin statue. Speak to this vendor to purchase the Relic of Crystal Communications, and move onto the sixth pillar.
Sixth pillar
You’ll need the Starry-Eyed Goggles for this section, along with the list of altar items from the earlier section of our guide.
Head to the non-instanced version of Zul’gurub in Northern Stranglethorn. Here, you’ll find five altars, and if you use the Torch of Pyrrtech near them, a spirit will appear.
To solve each altar, you will need to use one item from each of the categories we mentioned in the list—the categories being mount, pet, toy, and transmog—at the same time until you see the prompt “The spirit departs, satisfied with your acquisitions” in chat.
This is one of the pillars that other players can help you with. If you’ve got the Blood Orb toy and mount while they’re very close to you with the Blood pet, for example, the altar can trigger as being solved despite it not coming from one person.
When you’ve solved all five altars, use the Starry-Eyed Goggles to find the hidden Chest of Acquisitions in between the Blood and Void altars. Loot the Ancient Shaman Blood to finish this pillar.
Seventh pillar
For the seventh pillar, you will need the Fledgling Warden Owl, which can either be picked up as a Revered reputation reward from The Wardens or via the Auction House. It can range in price from 400 to 1K gold, with our feathery friend costing us 950 gold on a high-population server.
When you’ve got the pet, head to the Isle of the Watchers area of Azsuna and make sure you’ve summoned your new friend.
The Isle of the Watchers has nine owl statues, each of which is either in a state of activity or inactivity. Active owl statues will emit either red, purple, green, or blue and will apply a visual effect to both you and your owl. The aim here is to pick up an effect for each color option.
It’s worth switching to the Steady flight style instead of Dragonriding once you arrive at the Isle of the Watchers, as Dragonriding can cause pets to be unsummoned, which will, in turn, cause issues with picking up the corresponding buffs.
When you find an active statue, you’ll need to fly around the island and check all nine—an inactive one will give the prompt
As soon as you have all four buffs, the pet will have a sparkly white effect above its head, signifying that you can move on.
Next, take your charged-up Fledgling Warden Owl into the Vault of the Wardens dungeon and progress through to Cordana Felsong.
Defeat her, pick up Elune’s Light, hop on the elevator, and work your way backward until you get near Tiratharon Saltheril’s room. A previously locked room should now be open, with a Sentry Statue inside. Loot it to get an item of the same name, and then take it to the Glazer boss room.
Place the Sentry Statue in the middle of the ledge ahead of the boss platform. This will spawn a tricky light-based puzzle, which we would highly suggest using a third-party tool to solve. The aim of the game is to make all of the lights disappear, interacting with each statue.
When you’ve solved the puzzle, you will be able to loot the Warden’s Mirror item, signifying the end of the seventh pillar.
Eighth pillar
When you first entered the Felcycle instance, chances are that you noticed a few moveable statues on the way into the main chamber. Here, you’ll get to use them in a pressure plate puzzle that involves counting rats.
If you’re doing this in a group (it can be a group of up to three players), you will likely need to move one of the statues in the area. If not, you’ll definitely need to move three, and it’ll take longer, so group up if you have some guildies willing to help you.
You should have the Warden’s Mirror, Ancient Shaman Blood, and Relic of Crystal Connections items in your inventory from previous pillars.
Find the Enigma Machine in the Catacombs, then interact with it and choose the Begin option. Then, click it again and pick the Submit option.
This will spawn Rats, alongside the Catacomb Rats, which already existed in the instance. You need to work your way methodically through the instance, counting how many Rats (not Catacomb Rats) there are and killing both kinds of Rats.
When you have done this, you will need to input a code based on this number by getting statues or players to stand on the correct pressure plates. There are three locks to unlock, meaning you will need to rinse and repeat three times here.
You can see how to accurately represent the number of Rats in the table below. The term “one standing” can mean one player or one statue.
| Number of Rats | During the first unlock | During the second unlock | During the third unlock |
|---|---|---|---|
| One | One standing on Pressure Plate One | One standing on Pressure Plate Two | One standing on Pressure Plate Three |
| Two | One standing on Pressure Plate Two | One standing on Pressure Plate Four | One standing on Pressure Plate Six |
| Three | One standing on Pressure Plate Three | One standing on Pressure Plate Six | Two standing on Pressure Plate Two |
| Four | One standing on Pressure Plate Four | Two standing on Pressure Plate One | Two standing on Pressure Plate Five |
| Five | One standing on Pressure Plate Five | Two standing on Pressure Plate Three | Three standing on Pressure Plate One |
| Six | One standing on Pressure Plate Six | Two standing on Pressure Plate Five | Three standing on Pressure Plate Four |
| Seven | One standing on Pressure Plate Seven | Two standing on Pressure Plate Seven | One standing on Pressure Plate One |
| Eight | Two standing on Pressure Plate One | Three standing on Pressure Plate Two | One standing on Pressure Plate Four |
| Nine | Two standing on Pressure Plate Two | Three standing on Pressure Plate Four | One standing on Pressure Plate Seven |
| 10 | Two standing on Pressure Plate Three | Three standing on Pressure Plate Six | Two standing on Pressure Plate Three |
If you mess up during any of the unlock phases, your character will be electrocuted. This is a signal that you’ve been reset, meaning you need to start from the first step again.
Make sure to use the Relic of Crystal Connections when attempting to go into the room with the Humming Crystals. Use the purple to teleport in and the green to teleport out, remembering to bring any necessary statues with you as you go.
When you successfully unlock the third lock, the northern room near the orbs will be open to you, meaning you can progress onto the ninth pillar.
Ninth pillar
The ninth pillar requires the Starry-Eyed Goggles and Relic of Crystal Connections items from a previous pillar. Head back to the cave where you found the Peculiar Gem by dropping through a hole in the wall.
Use the Starry-Eyed Goggles to locate a Humming Crystal platform above you, then teleport upwards with the Relic of Crystal Connections.
Interact with the Decryption Console. Enter “84847078” and select Submit, opening the nearby Encrypted Chest. This will—finally—reward you with the Keys to Incognitro, the Indecipherable Felcycle, along with the Ratt’s Revenge Feat of Strength.
Future updates to the Incognitro Felcycle
If you’re hoping to pick up the Keys to Incognitro, the Indecipherable Felcycle, after the end of WoW‘s 20th Anniversary, don’t worry about running out of time. There’s been official confirmation from a WoW community manager on the Blizzard forums that it will be an evergreen mount hunt.
The community manager shared that Alyx would be hopping over to Dornogal after the end of the 20th Anniversary, meaning the associated quests and achievements would still be possible to tackle. It’ll likely require slightly different steps but be roughly the same in practice.
Additionally, it seems as if the Felcycle puzzle is not currently complete in the game. The final hint that you’ll come across with the ninth pillar has been translated by Secret Finding Discord members to mean “TTFN,” implying that the team behind the secret is saying goodbye—for now.
It’s believed that the final three pillars could unlock flying for the Incognitro Felcycle mount and that we may see them in the next patch, but this is speculation. When this is confirmed, or further information is reveaked, we will add the next steps to this guide.
For now, you can snag the secret Felcycle mount by following the steps above. If you’re in the mood to hunt more mounts and add to your growing collection, make sure to take a look at the Ol’ Mole Rufus mount, as it’s one of the most unique models in The War Within.
Read the full article here













Discussion about this post